
Accounts management
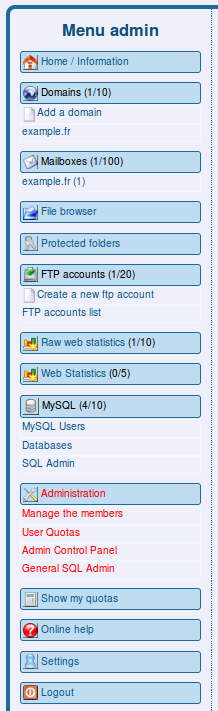
The AlternC Administrator, in his Virtual Desktop, has an additional menu called "Admin".
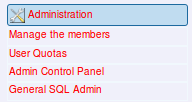
The blue links in the Virtual Desktop of the administrator are the same as any other standard account. In this rubric we will only cover the red administrator-specific links.
The administrator account of AlternC
The AlternC Administrator, in his Virtual Desktop, has an additional menu called "Admin".
The blue links in the Virtual Desktop of the administrator are the same as any other standard account. In this rubric we will only cover the red administrator-specific links.
The "AlternC admin" main task is to administrate AlternC hosting accounts on the server. The terms "member" and "account" are used. AlternC was developed in a free software community, by a non-profit association, which explains the term used : "member" for the accounts.
The "AlternC Administrator" can create accounts, set their quotas (domain names, email accounts, mailing-lists etc.), give them administrative rights, block them, delete them, connect to any account, and therefore see all the other accounts’ files...
The password of the "admin" account must be a REAL password (a mix of figures, special characters and low and up-case letters). This account is sensitive since it gives access to any account hosted on your server.
The Virtual Desktop menu is the same as any other account, except for one rubric, the "Administration" one, as shown below:
Account list
A click on the link "manage the members" shows you the list of all the accounts hosted on the server in the right side of the Virtual Desktop.
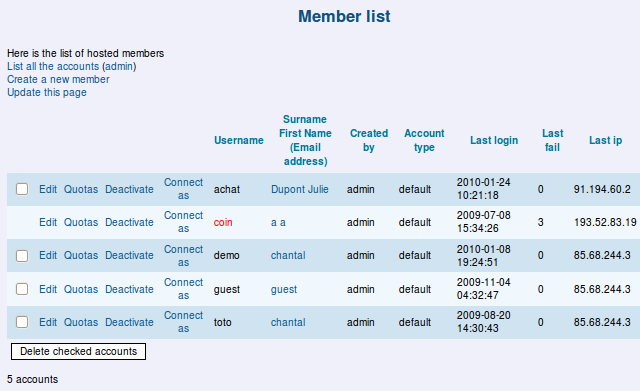
In this list, the accounts in red are the administrator or restricted administrator accounts.
This table contains 10 columns:
- A checkbox (to delete an account);
- A link "edit" to change the personal information of an account;
- A link "quotas" to set the services quotas of an account;
- A link "connect as" to impersonate into any other account as an administrator
- The name of the account
- The identity of the owner of the account, with a link to his email address
- The type of account (if there is many account types on your server)
- The date of last connection to this account
- The number of connection attempts since the last successful connection.
- The IP address of the last machine who tried to connect to this account
In this screenshot, we can see that the "octo" account never connect to the Virtual Desktop.
Here is an example of an account where someone tried to connect to with a wrong password:

The line with the hour and IP address of the last machine allows you to start searching more if there is suspicious connections to an account.
This table is also where you can create and delete accounts.
Account creation
To create a new account (usually named "member" by the server), it’s as easy as when you created an email account.
- Click the link "Create a new member"
- Fill the form
- Validate the form by clicking the button [Create a new member]

- Login : The login that will be used for this account (it uniqely identifies the account and serve as a login to connect to the virtual desktop)
- Initial Password : The password (to be confirmed in the next field) that the user can change later (or not changed if the administrator didn’t gave him the ability to change his password).
- Name / Firstname : The identity of the owner of the account.
- Email Address : The email address where you will send password confirmation, or any other information about the server.
- Account type : you should leave this value to the default, we will see it later on.
Note: The name of the account owner is not necessarily the one of the person that will manage the account.
Editing an account
A click on the "edit" link in the account list allows you to change some informations regarding an account.
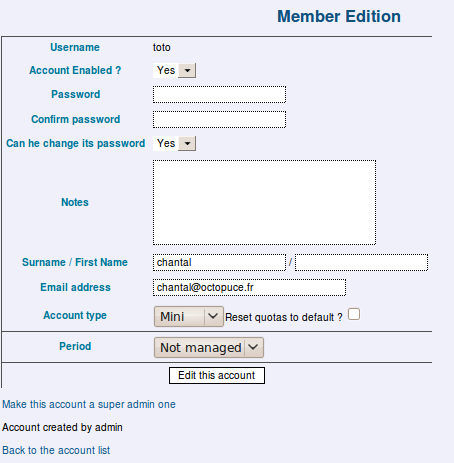
To do it, just fill the form values as you want.
The "account enabled" dropdown list allows you to lock the user out of his account ("no" position). To allow him back, set it to "yes".
If you don’t want to change the password of the account, leave the password field blank. It will not be changed.
The account type is about quotas. We will talk about it later.
The billing period is not enabled on our demo server since it’s not a commercial one.
Warning: The link "Make this account an administrator one" gives administrator rights to the corresponding account. That way, he can create other accounts. Don’t give this right to anybody!
Account quotas management
New users have default service quotas for each service (ftp, emails, domain names etc.). We will se later how to change the default quotas.
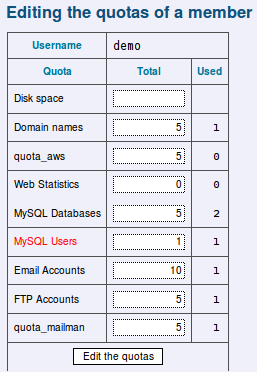
We will customize the quotas of the "demo" account. To do so, we clicked the "quotas" link for the "demo" account in the member list.
The form fields allows you to enter new quota values for each service. A column after each field shows you the used quota for each service for this user account (here, 2 ftp accounts are used, which is the maximum allowed for this user, that’s why this value is red).
Click the button [Change the quotas] to save your quotas changes.
Connect to another account from the "admin" account.
Before clicking the "connect as " link on any account, ensure that the administrator or owner of the account allowed you to do so.
Warning: Don’t open this link in a new tab or new window. AlternC don’t allow you to be connected to many Virtual Desktop accounts at the same time.
When you click the "connect as" link, the Virtual Desktop of the chosen account shows instead of the administrator one. To go back to the "admin" account, you will have to logout and login back, using the admin login and password.
User Quotas
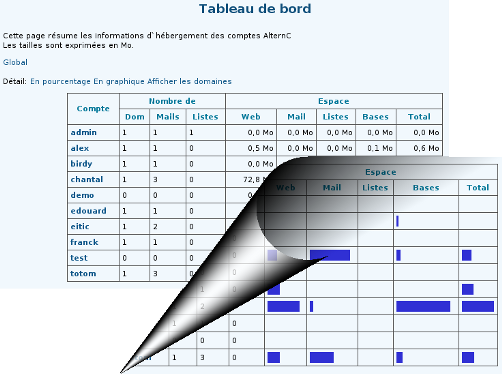
The link "User quotas" is available to any AlternC administrator. It shows you the space usage for each account, either in MB or in percentage used on the total service usage on the server. (figures or graphics).
Author Published : 04/02/10 Updated : 05/02/10
Translations : English, français